Programming in CUDA
Introduction
Modern GPUs are composed of many cores capable of computing hundreds of threads simultaneously. In this module we will use the CUDA platform from nVIDIA to give our code access to the massive computing power of these cards.
What is CUDA?
CUDA is a free proprietary platform designed by NVIDIA specifically for NVIDIA devices. It allows us to transfer memory between the GPU and CPU and run code on both processors. CUDA code is written in an extended version of C and CUDA files have the prefix .cu They are compiled by NVIDIA’s nvcc compiler.
Challenges
CUDA programming is fundamentally different from regular programming because the code is run on two seperate processors, the host CPU and the device GPU. This makes coding more difficult because
- The GPU and CPU don’t share memory
- The GPU code can’t be run on the CPU and visa versa
Let’s look at how CUDA works around these limitations.
Memory management in CUDA
CUDA 6 Unified Memory
Warning
This section is for CUDA 6 only. The following methods won’t work on all devices. You must use Windows or Linux and have a device with compute capability >= 3.0.
Linux: To find the compute capability of your device, run
/usr/local/cuda/samples/1_Utilities/deviceQuery/deviceQuery
and look at the CUDA capablity line. If that command doesn’t work you may have to build the code:
cd /usr/local/cuda/samples/1_Utilities/deviceQuery
sudo make
./deviceQuery
GPUs have their own dedicated RAM that is seperate from the RAM the CPU can use. If we want both the CPU and GPU to be able to access a value we must tell our program to allocate unified memory.
Note
There is no physical unified memory, but instead CUDA unified memory
is simply a convenient abstraction for programmers. Underneath, the system moves data from host to device and back, and the code running on the CPU accesses the CPU memory, while the code running on the GPU accesses the GPU memory.
We do this with the cudaMallocManaged() function. It works nearly identically to malloc but we have to pass in an address to a pointer as well as the size because cudaMallocManaged returns a cudaError_t instead of a pointer.
Ex: cudaMallocManaged((void**)&ptr, SIZE * sizeof(int))
Using cudaMalloc and cudaMemcpy
Some older devices don’t support unified memory. In addition, it can be advantageous to manage the memory on the CPU and the GPU in your programs. To accomplish this, you use cudaMalloc() and cudaMemcpy() to allocate and transfer memory. cudaMalloc() is very similar to cudaMallocManaged() and takes the same arguments. However, the CPU code will not be able to access memory allocated this way.
As shown in the following code segment, to transfer memory between the devices we use cudaMemcpy(), which takes a pointer to the destination, a pointer to the source, a size, and a fourth value representing the direction of the data flow. This last value should be cudaMemcpyDeviceToHost or cudaMemcpyHostToDevice Once you’re done with memory allocated using either method you can free it by calling cudaFree() on the pointer.
1 2 3 4 5 6 7 8 9 10 11 | int *ptr, *dev_ptr;
initialize_ptr(ptr); //creating the block of SIZE data values of type int
// in memory on CPU, pointed to by ptr (not shown)
cudaMalloc((void**)&ptr, SIZE * sizeof(int));
cudaMemcpy(dev_ptr, ptr, SIZE * sizeof(int), cudaMemcpyHostToDevice);
...Perform GPU Operations ...
cudaMemcpy(ptr, dev_ptr, SIZE * sizeof(int), cudaMemcpyDeviceToHost);
cudaFree(dev_ptr);
free(ptr);
|
It’s usually a good idea to use cudaMalloc() and cudaMemcpy() instead of cudaMallocManaged() unless you need to do deep copies on nested structs like linked lists. You will see why later on in the lab.
Host Code vs. Device Code
Because CPU code and GPU code use different instruction sets, we must tell the compiler whether our functions will run on the CPU or the GPU. We do this with three new modifiers.
- __global__ functions run on the GPU and can be called anywhere in the program. These functions are called kernels because they contain the information threads used to create threads.
- __device__ functions run on the GPU and can only be called by __global__ and other __device__ methods. They tend to be helper methods called by threads.
- __host__ functions are run on the CPU and can only be called by other __host__ methods.
If you don’t add one of these modifiers to a function definition the compiler assumes it’s a __host__ function. It’s also possible for a function to be both __host__ and __device__ this is useful because it allows you to test GPU functions on the CPU.
Threads
CUDA splits it’s treads into three dimensional blocks which are arranged into a two dimensional grid. Threads in the same block all have access to a local shared memory which is faster than the GPU’s global memory.
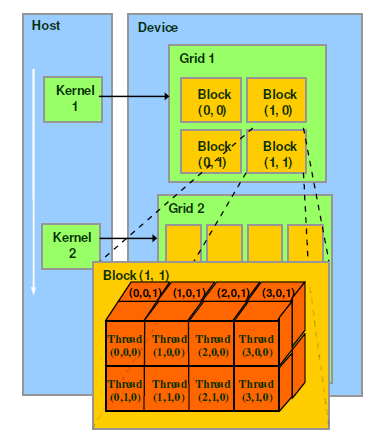
Image from North Carolina State University
CUDA provides a handy type, dim3 to keep track of these dimensions. You can declare dimensions like this: dim3 myDimensions(1,2,3);, signifying the ranges on each dimension. Both blocks and grids use this type even though grids are 2D. To use a dim3 as a grid dimension, leave out the last argument or set it to one. Each device has it’s own limit on the dimensions of blocks. Run
/usr/local/cuda/samples/1_Utilities/deviceQuery/deviceQuery
to find the limits for your device.
Kernels
CUDA threads are created by functions called kernels which must be __global__. Kernels are launched with an extra set of parameters enclosed by <<< and >>> the first argument is a dim3 representing the grid dimensions and the second is another dim3 representing the block dimensions. You can also use ints instead of dim3s, this will create a Nx1x1 grid. After a kernel is launched, it creates the number of threads specified and runs each of them. CUDA automatically waits for the devices to finish before you can access memory using cudaMemcpy() although if you’re using unified memory with cudaMallocManaged() you will need to call cudaDeviceSynchronize() to force the CPU to wait for the GPU.
1 2 3 4 | dim3 numBlocks(8,8);
dim3 threadsPerBlock(8,8,8);
myKernel<<<numBlocks, threadsPerBlock>>>(args);
myKernel<<<16,64>>>(args);
|
Kernels have access to 4 variables that give information about a thread’s location in the grid
- threadIdx.[xyz] represents a thread’s index along the given dimension.
- blockIdx.[xy] represents a thread’s block’s index along the given dimension.
- blockDim.[xyz] represents the number of threads per block in the given direction.
- gridDim.[xy] represents the number of blocks in the given direction.
By using these variables we can create a unique id for each thread indexed from 0 to N where N is the total number of threads. For a one dimensional grid and a one dimesional block this formula is blockIdx.x * blockDim.x + threadIdx.x
Compiling
CUDA code is compiled with NVIDIA’s own compiler nvcc. You can still use makefiles like you do with regular c. To make sure your code is taking full advantage of your device’s capabilities use the flag -gencode arch=compute_XX,code=sm_XX you can find the correct values of the Xs by running
/usr/local/cuda/samples/1_Utilities/deviceQuery/deviceQuery
and using at the output of the CUDA capability line without the period.
